검색

레이블이 CentOS인 게시물을 표시합니다. 모든 게시물 표시

2021년 4월 2일

MPMs worker 를 이용한 아파치 웹서버 성능 업 !!

 yum 패키지 매니저를 사용하여 설치한 Apache 웹서버는 prefork 불리우는 방법으로 클라이어트의 요청을 처리하도록 되어 있다. prefork 는 Apache 2 부터 도입된 MPMs (다중처리 모듈들, Multi-Processing Modules) 중 하나이다. MPMs 는 Prefork, Worker, Event 가 있으며 이외에도 Threadpool, Perchild, Leader 등 여러가지가 있다.


CASE

prefork 방식으로 설정된 Apache 웹서버를 잘 사용하고 있었으나 클라이언트 수가 늘어나면서 응답이 현저하게 지연되는 현상이 반복되었다. 응답이 지연되는 경우에도 CPU, Memory 은 충분한 여유가 있었다.

  • CPU 2.0GHz (6Core),  32GB 
  • Redhat Linux 6.5 (64bit)
  • Apache 2.2.14 (64bit) 

SOLUTION

Prefork 방식의 성능 저하는 단일 스레드의 자식 스레드에서 한번에 하나의 요청을 순차적으로 처리하는 방식에 의한 한계로 추정하고 Worker 방식으로 변경하였다. 

① /etc/sysconfig/httpd 설정 파일의  HTTPD 값을  /usr/sbin/httpd.worker 으로 변경한다.

② /etc/httpd/conf/httpd.conf 파일에서 worker MPM 설정을 변경한다.

③ 마지막으로 아파치 서버를 다시 시작하면 worker MPM 방식으로 동작하게 된다.


성능은 기대이상으로 놀라웠다. Prefork 방식의 경우와는 다르게 지연 없이 응답에 빠르게 동작하고 있다. 많은 요청이 발생하는 경우 멀티스레드 방식의 유용함을 체험할 수 있었다.


참고

How To Install the Apache Web Server on CentOS 7

Understanding Apache 2 MPM

Apache MPMs Explained

2020년 11월 8일

오라클 클라우드 무료 체험하기 - Part2 Web 서버 구축하기

MySql 구축과 동일한 방법으로 웹 서버 구축을 위한 VM 인스턴스를 추가한다. 예상되는 전체 작업 순서는 아래와 같다.


① VM 인스터스 생성 (CentOS 7.x)
② VM 인스턴스 공인 IP 및 방화벽 설정
③ 블록 스토이지 생성
④ 블록 스토이지 와 VM 인스턴스 연결
⑤ WAS/WAS 설치 (nginx, tomcat)
⑥ 웹 프로그램 설치 및 테스트


(인스턴스 생성 및 IP 설정은 이전 게시물 참조 :  오라클 클라우드 무료 체험하기 - Part1 MySql 구축하기)  


블록 스토이지 생성

블록 볼륨(Block Volume) 서비스는 블록 스토리지를 제공하고 관리하는 네트워크 기반 스토리지 서비스이다. VM 인스턴스는 이 블록 스토이지(Block Storage)를 마운트하여 스토리지를 확장하여 사용할 수 있다.  새로운 블록을 생성하고 이를 웹 서버 VM 인스턴스에서 마운트하여 웹 데이터 공간으로 사용할 계획이다. 블록 스토리지를 추가하는 방법은 아래와 같이 3단계가 필요하다.  

① 오라클 클라이우드 콘솔 (Web UI)에서 블록 볼륨 리소스 생성
② 블록 볼륨을 VM 인스턴스에 연결
③ VM 인스턴스에서 블록 볼륨을 파일 시스템으로 마운트


블록은 50GB 크기로 생성했다. 


블록 스토이지 연결

이제 웹 서버 용도로 생성한 VM 인스턴스 에서 생성한 블록을 연결한다.


블록 볼륨과 VM 이 연결되면 "iSCSI 명령 및 정보" 항목을 확인하고 연결을 위한 명령을 복사한다. 


  sudo iscsiadm -m node -o new -T iqn.2015-12.com.oracleiaas:b8949530-afa4-4546-a6ff-4b33f67e5a1e -p 169.254.2.2:3260
  
  sudo iscsiadm -m node -o update -T iqn.2015-12.com.oracleiaas:b8949530-afa4-4546-a6ff-4b33f67e5a1e -n node.startup -v automatic
  
  sudo iscsiadm -m node -T iqn.2015-12.com.oracleiaas:b8949530-afa4-4546-a6ff-4b33f67e5a1e -p 169.254.2.2:3260 -l

  
SSH 접속 하여 복사한 iSCSI 명령어를 모두 실행하고 lsblk 명령으로 블록 볼륨이 마운트 되어 있는지 확인한다. 아래의 예에서는 sdb 이름의 50GB 디스크를 확인할 수 있다.
$lsblk
NAME   MAJ:MIN RM  SIZE RO TYPE MOUNTPOINT
sda      8:0    0 46.6G  0 disk 
├─sda1   8:1    0  512M  0 part /boot/efi
├─sda2   8:2    0    8G  0 part [SWAP]
└─sda3   8:3    0 38.1G  0 part /
sdb      8:16   0   50G  0 disk 
다음으로 연결된 블록 볼륨을 사용하기 위하여 ext4 형식으로 디스크를 포맷한다.
$sudo mkfs.ext4 -m 0 -E lazy_itable_init=0,lazy_journal_init=0,discard /dev/sdb

mke2fs 1.42.9 (28-Dec-2013)
/dev/sdb is entire device, not just one partition!
Proceed anyway? (y,n) y
Filesystem label=
OS type: Linux
Block size=4096 (log=2)
Fragment size=4096 (log=2)
Stride=0 blocks, Stripe width=256 blocks
3276800 inodes, 13107200 blocks
0 blocks (0.00%) reserved for the super user
First data block=0
Maximum filesystem blocks=2162163712
400 block groups
32768 blocks per group, 32768 fragments per group
8192 inodes per group
Superblock backups stored on blocks: 
	32768, 98304, 163840, 229376, 294912, 819200, 884736, 1605632, 2654208, 
	4096000, 7962624, 11239424

Allocating group tables: done                            
Writing inode tables: done                            
Creating journal (32768 blocks): done
Writing superblocks and filesystem accounting information: done 


이제 마운트할 디렉토리를 생성하고 마운트 한다. ( sdb 를 /data 에 마운트하고 권한을 부여한다. )
$ sudo mkdir /data
$ sudo mount -o discard,defaults /dev/sdb /data
$ sudo chmod a+w /data

마지막으로 /etc/fstab 파일을 수정하여 부팅과 동시에 마운트 되도록 한다.

$ sudo blkid /dev/sdb
/dev/sdb: UUID="3c50667e-98f3-46f9-acfe-1bc10151696c" TYPE="ext4" 
$vi /etc/fstab

UUID=3c50667e-98f3-46f9-acfe-1bc10151696c /data ext4 discard,defaults,noatime,_netdev 0 2


웹 서버 설치

웹서버는 nginx + tomcat 로 구성하여 설치한다. 가장 최신 open jdk 버전을 설치한다. (14.0.2)
   
$sudo yum install java-latest-openjdk-devel.x86_64

$java -version
openjdk version "14.0.2" 2020-07-14
OpenJDK Runtime Environment 20.3 (build 14.0.2+12)
OpenJDK 64-Bit Server VM 20.3 (build 14.0.2+12, mixed mode, sharing)

톰켓 설치는 홈페이지를 방문하여 원하는 버전의 다운로드 링크를 복사한 다음 wget 명령을 사용하여 설치 파일을 다운로드한다.
  

http://apache.tt.co.kr/tomcat/tomcat-8/v8.5.58/bin/apache-tomcat-8.5.58.zip 다운로드가 완료되면 압축을 풀고 원하는 위치로 복사한다. (여기에서는 /data 를 사용했다.)
$wget http://apache.tt.co.kr/tomcat/tomcat-8/v8.5.58/bin/apache-tomcat-8.5.58.zip
$tar -xzvf apache-tomcat-8.5.58.zip
$mv apache-tomcat-8.5.58.zip /data/

nginx 설치를 위해서는 CentOS 7 EPEL 레파지토리를 추가해야 한다. 다음 명령으로 레파지토리를 추가한다. 
 
$sudo yum install epel-release

Loaded plugins: fastestmirror, langpacks
Loading mirror speeds from cached hostfile
 * base: mirror.kakao.com
 * epel: ord.mirror.rackspace.com
 * extras: mirror.kakao.com
 * updates: mirror.kakao.com
Resolving Dependencies
--> Running transaction check
---> Package epel-release.noarch 0:7-11 will be updated
---> Package epel-release.noarch 0:7-12 will be an update
--> Finished Dependency Resolution

Dependencies Resolved

=========================================================================================================================================================================================
 Package                                           Arch                                        Version                                   Repository                                 Size
=========================================================================================================================================================================================
Updating:
 epel-release                                      noarch                                      7-12                                      epel                                       15 k

Transaction Summary
=========================================================================================================================================================================================
Upgrade  1 Package

Total download size: 15 k
Is this ok [y/d/N]: y
Downloading packages:
Delta RPMs disabled because /usr/bin/applydeltarpm not installed.
epel-release-7-12.noarch.rpm                                                                                                                                      |  15 kB  00:00:01     
Running transaction check
Running transaction test
Transaction test succeeded
Running transaction
  Updating   : epel-release-7-12.noarch                                                                                                                                              1/2 
  Cleanup    : epel-release-7-11.noarch                                                                                                                                              2/2 
  Verifying  : epel-release-7-12.noarch                                                                                                                                              1/2 
  Verifying  : epel-release-7-11.noarch                                                                                                                                              2/2 

Updated:
  epel-release.noarch 0:7-12                                                                                                                                                             
Complete!
이제 nginx 를 설치한다.
sudo yum install nginx
$sudo yum install nginx
Loaded plugins: fastestmirror, langpacks
Loading mirror speeds from cached hostfile
 * base: mirror.kakao.com
 * epel: ord.mirror.rackspace.com
 * extras: mirror.kakao.com
 * updates: mirror.kakao.com
Resolving Dependencies
--> Running transaction check
---> Package nginx.x86_64 1:1.16.1-2.el7 will be installed
--> Processing Dependency: nginx-all-modules = 1:1.16.1-2.el7 for package: 1:nginx-1.16.1-2.el7.x86_64
--> Processing Dependency: nginx-filesystem = 1:1.16.1-2.el7 for package: 1:nginx-1.16.1-2.el7.x86_64
--> Processing Dependency: nginx-filesystem for package: 1:nginx-1.16.1-2.el7.x86_64
--> Processing Dependency: libprofiler.so.0()(64bit) for package: 1:nginx-1.16.1-2.el7.x86_64
--> Running transaction check
---> Package gperftools-libs.x86_64 0:2.6.1-1.el7 will be installed
---> Package nginx-all-modules.noarch 1:1.16.1-2.el7 will be installed
--> Processing Dependency: nginx-mod-http-image-filter = 1:1.16.1-2.el7 for package: 1:nginx-all-modules-1.16.1-2.el7.noarch
--> Processing Dependency: nginx-mod-http-perl = 1:1.16.1-2.el7 for package: 1:nginx-all-modules-1.16.1-2.el7.noarch
--> Processing Dependency: nginx-mod-http-xslt-filter = 1:1.16.1-2.el7 for package: 1:nginx-all-modules-1.16.1-2.el7.noarch
--> Processing Dependency: nginx-mod-mail = 1:1.16.1-2.el7 for package: 1:nginx-all-modules-1.16.1-2.el7.noarch
--> Processing Dependency: nginx-mod-stream = 1:1.16.1-2.el7 for package: 1:nginx-all-modules-1.16.1-2.el7.noarch
---> Package nginx-filesystem.noarch 1:1.16.1-2.el7 will be installed
--> Running transaction check
---> Package nginx-mod-http-image-filter.x86_64 1:1.16.1-2.el7 will be installed
--> Processing Dependency: gd for package: 1:nginx-mod-http-image-filter-1.16.1-2.el7.x86_64
--> Processing Dependency: libgd.so.2()(64bit) for package: 1:nginx-mod-http-image-filter-1.16.1-2.el7.x86_64
---> Package nginx-mod-http-perl.x86_64 1:1.16.1-2.el7 will be installed
---> Package nginx-mod-http-xslt-filter.x86_64 1:1.16.1-2.el7 will be installed
---> Package nginx-mod-mail.x86_64 1:1.16.1-2.el7 will be installed
---> Package nginx-mod-stream.x86_64 1:1.16.1-2.el7 will be installed
--> Running transaction check
---> Package gd.x86_64 0:2.0.35-26.el7 will be installed
--> Processing Dependency: libXpm.so.4()(64bit) for package: gd-2.0.35-26.el7.x86_64
--> Running transaction check
---> Package libXpm.x86_64 0:3.5.12-1.el7 will be installed
--> Finished Dependency Resolution

Dependencies Resolved

=========================================================================================================================================================================================
 Package                                                   Arch                                 Version                                         Repository                          Size
=========================================================================================================================================================================================
Installing:
 nginx                                                     x86_64                               1:1.16.1-2.el7                                  epel                               562 k
Installing for dependencies:
 gd                                                        x86_64                               2.0.35-26.el7                                   base                               146 k
 gperftools-libs                                           x86_64                               2.6.1-1.el7                                     base                               272 k
 libXpm                                                    x86_64                               3.5.12-1.el7                                    base                                55 k
 nginx-all-modules                                         noarch                               1:1.16.1-2.el7                                  epel                                20 k
 nginx-filesystem                                          noarch                               1:1.16.1-2.el7                                  epel                                21 k
 nginx-mod-http-image-filter                               x86_64                               1:1.16.1-2.el7                                  epel                                30 k
 nginx-mod-http-perl                                       x86_64                               1:1.16.1-2.el7                                  epel                                39 k
 nginx-mod-http-xslt-filter                                x86_64                               1:1.16.1-2.el7                                  epel                                29 k
 nginx-mod-mail                                            x86_64                               1:1.16.1-2.el7                                  epel                                57 k
 nginx-mod-stream                                          x86_64                               1:1.16.1-2.el7                                  epel                                85 k

Transaction Summary
=========================================================================================================================================================================================
Install  1 Package (+10 Dependent packages)

Total download size: 1.3 M
Installed size: 4.0 M
Is this ok [y/d/N]: y
Downloading packages:
(1/11): gd-2.0.35-26.el7.x86_64.rpm                                                                                                                               | 146 kB  00:00:00     
(2/11): libXpm-3.5.12-1.el7.x86_64.rpm                                                                                                                            |  55 kB  00:00:00     
(3/11): gperftools-libs-2.6.1-1.el7.x86_64.rpm                                                                                                                    | 272 kB  00:00:00     
(4/11): nginx-1.16.1-2.el7.x86_64.rpm                                                                                                                             | 562 kB  00:00:01     
(5/11): nginx-all-modules-1.16.1-2.el7.noarch.rpm                                                                                                                 |  20 kB  00:00:00     
(6/11): nginx-filesystem-1.16.1-2.el7.noarch.rpm                                                                                                                  |  21 kB  00:00:00     
(7/11): nginx-mod-http-image-filter-1.16.1-2.el7.x86_64.rpm                                                                                                       |  30 kB  00:00:00     
(8/11): nginx-mod-http-perl-1.16.1-2.el7.x86_64.rpm                                                                                                               |  39 kB  00:00:00     
(9/11): nginx-mod-http-xslt-filter-1.16.1-2.el7.x86_64.rpm                                                                                                        |  29 kB  00:00:00     
(10/11): nginx-mod-mail-1.16.1-2.el7.x86_64.rpm                                                                                                                   |  57 kB  00:00:00     
(11/11): nginx-mod-stream-1.16.1-2.el7.x86_64.rpm                                                                                                                 |  85 kB  00:00:00     
-----------------------------------------------------------------------------------------------------------------------------------------------------------------------------------------
Total                                                                                                                                                    383 kB/s | 1.3 MB  00:00:03     
Running transaction check
Running transaction test
Transaction test succeeded
Running transaction
  Installing : gperftools-libs-2.6.1-1.el7.x86_64                                                                                                                                   1/11 
  Installing : 1:nginx-filesystem-1.16.1-2.el7.noarch                                                                                                                               2/11 
  Installing : libXpm-3.5.12-1.el7.x86_64                                                                                                                                           3/11 
  Installing : gd-2.0.35-26.el7.x86_64                                                                                                                                              4/11 
  Installing : 1:nginx-mod-stream-1.16.1-2.el7.x86_64                                                                                                                               5/11 
  Installing : 1:nginx-mod-http-xslt-filter-1.16.1-2.el7.x86_64                                                                                                                     6/11 
  Installing : 1:nginx-mod-http-perl-1.16.1-2.el7.x86_64                                                                                                                            7/11 
  Installing : 1:nginx-mod-mail-1.16.1-2.el7.x86_64                                                                                                                                 8/11 
  Installing : 1:nginx-1.16.1-2.el7.x86_64                                                                                                                                          9/11 
  Installing : 1:nginx-mod-http-image-filter-1.16.1-2.el7.x86_64                                                                                                                   10/11 
  Installing : 1:nginx-all-modules-1.16.1-2.el7.noarch                                                                                                                             11/11 
  Verifying  : libXpm-3.5.12-1.el7.x86_64                                                                                                                                           1/11 
  Verifying  : 1:nginx-mod-stream-1.16.1-2.el7.x86_64                                                                                                                               2/11 
  Verifying  : 1:nginx-filesystem-1.16.1-2.el7.noarch                                                                                                                               3/11 
  Verifying  : 1:nginx-all-modules-1.16.1-2.el7.noarch                                                                                                                              4/11 
  Verifying  : gperftools-libs-2.6.1-1.el7.x86_64                                                                                                                                   5/11 
  Verifying  : 1:nginx-mod-http-image-filter-1.16.1-2.el7.x86_64                                                                                                                    6/11 
  Verifying  : gd-2.0.35-26.el7.x86_64                                                                                                                                              7/11 
  Verifying  : 1:nginx-mod-http-xslt-filter-1.16.1-2.el7.x86_64                                                                                                                     8/11 
  Verifying  : 1:nginx-mod-http-perl-1.16.1-2.el7.x86_64                                                                                                                            9/11 
  Verifying  : 1:nginx-mod-mail-1.16.1-2.el7.x86_64                                                                                                                                10/11 
  Verifying  : 1:nginx-1.16.1-2.el7.x86_64                                                                                                                                         11/11 

Installed:
  nginx.x86_64 1:1.16.1-2.el7                                                                                                                                                            

Dependency Installed:
  gd.x86_64 0:2.0.35-26.el7               gperftools-libs.x86_64 0:2.6.1-1.el7               libXpm.x86_64 0:3.5.12-1.el7               nginx-all-modules.noarch 1:1.16.1-2.el7          
  nginx-filesystem.noarch 1:1.16.1-2.el7  nginx-mod-http-image-filter.x86_64 1:1.16.1-2.el7  nginx-mod-http-perl.x86_64 1:1.16.1-2.el7  nginx-mod-http-xslt-filter.x86_64 1:1.16.1-2.el7 
  nginx-mod-mail.x86_64 1:1.16.1-2.el7    nginx-mod-stream.x86_64 1:1.16.1-2.el7            

Complete!
설치가 완료되면 아래와 같이 http, https 포트에 대한 방화벽을 오픈한다.
#sudo firewall-cmd --zone=public --permanent --add-service=http
#sudo firewall-cmd --zone=public --permanent --add-service=https
#sudo firewall-cmd --reload 


참고로 nginx 의 웹 루트는 /data/www 로 변경하였고 톰켓의 웹 프로그램은 /data/webapps/ 로 변경하였다. 이제 nginx 를 시작한다.
sudo systemctl start nginx

웹 브라우져를 통하여 사이트를 접속하니 퍼미션 오류가 기다리고 있었다. 먼저 보안 관련 이슈를 확인하기 위하여 /var/log/audit/audit.log 로그를 확인했고 아래의 보안 이슈를 확인하게 되었다.
type=AVC msg=audit(1601820483.230:3808): avc:  denied  { read } for  pid=4741 comm="nginx" name="index.html" dev="sdb" ino=2359732 scontext=system_u:system_r:httpd_t:s0 tcontext=unconfined_u:object_r:unlabeled_t:s0 tclass=file permissive=0
type=SYSCALL msg=audit(1601820483.230:3808): arch=c000003e syscall=2 success=no exit=-13 a0=5571a0b1bc1a a1=800 a2=0 a3=55719f96d110 items=0 ppid=4740 pid=4741 auid=4294967295 uid=994 gid=992 euid=994 suid=994 fsuid=994 egid=992 sgid=992 fsgid=992 tty=(none) ses=4294967295 comm="nginx" exe="/usr/sbin/nginx" subj=system_u:system_r:httpd_t:s0 key=(null)
type=PROCTITLE msg=audit(1601820483.230:3808): proctitle=6E67696E783A20776F726B65722070726F63657373

audit2why 명령을 사용하여 원인을 확인해 본다. 보다 정확한 원인 및 조치방법을 알기위하여 웹 검색 결과 SELinux 보안이 이슈의 원인인 것으로 확인 할 수 있었다.
  
$sudo grep 1601820483.230:3808 /var/log/audit/audit.log | audit2why

	Was caused by:
		Missing type enforcement (TE) allow rule.

		You can use audit2allow to generate a loadable module to allow this access.
 
$semanage fcontext -a -t httpd_sys_content_t /usr/share/nginx/html/studio(/.*)?
$restorecon -Rv /www

❶ 톰켓과 프록시 연결시 오류는 → (13: Permission denied) while connecting to upstream:[nginx] 아래 명령을 통하여 해결 할 수 있었다.
setsebool -P httpd_can_network_connect

❷ /data/www 경로에 대한 접근 권한 오류는 아래와 같은 명령을 통하여 해결 할 수 있었다.
  
$chcon -Rt httpd_sys_content_t /data/www


익숙한 httpd 를 사용하지 않은 것은 클라우드 서버의 성능을 고려하여 적은 자원을 사용한다고 알려진 nginx 를 사용하게 되었는데 nginx 설치는 처음이라 보안 관련 이슈를 해결하는 과정에서 많은 시간을 소요하였다. 


참고자료

2020년 10월 4일

오라클 클라우드 무료 체험하기 - Part1 MySql 구축하기

무료로 클라우드 서비스 이용이 가능하다는 글을 접하고 자체 서버를 이용하여 운영하던 개발 환경을 클라우드 환경으로 변경하고자 시도하였다. 클라우드라 하여 특별한 것은 없었고 용어 또는 논리적인 개념의 이해가 요구되었다. 처음 클라우드 서비스를 접하는 거지만 많은 인터넷 자료들이 있고 과거 물리적 서버 구축 경험이 있어 실재 구축은 1시간 정도 소요된 것 같다.

오라클 클라우드

본 글에서는 클라우드 서비스를 기반으로 WEB/WAS 서버와 DBMS 서버 구현 작업을 계획하였다. 무료 오라클 클라우드는 아래와 같은 순서의 작업을 통하여 이용할 수 있다.(→ MySql 서버 생성 포함) 

① Oracle Cloud 계정 생성

② VM 인스터스 생성 (CentOS 7.x)

③ 원격 접속 

④ MySql 설치

⑤ VM 인스턴스  공인 IP 및 방화벽 설정

⑥ 로컬에서 MySQLWorkbench 툴을 이용한 MySql 접속


Oracle Cloud 계정 생성

계정 생성을 위하여 아래 홈페이지를 방문한다. 

https://www.oracle.com/kr/cloud/


Oracle Cloud Tier 무료체험하기 버튼을 클릭하여 계정을 생성한다. (계정 생성을 위해서는 주소, 모바일 인증 그리고 신용카드 등록이 필요하다.)

계정 생성이 완료되면 자동으로 클라우드 서비스 관리를 위한 웹 콘솔로 이동된다.


인스턴스 생성하기

웹 콘솔에서 VM 인스턴스 생성 을 클릭한다.


OS 이미지는 디폴트로 Oracle Linux 선택되어 있지만 변경이 가능하고 평소 사용하던 CentOS 를 선택하였다. 


리눅스 인스턴스의 경우는 원격 접속을 위하여 비밀번호 대신 SSH 키쌍을 사용하도록 되어 있다. 원격 접속 작업을 위하여 전용 키를 다운로드 한다.


인스턴스 생성이 완료되면 IP 와 계정을 확인 한다.


리모트 접속

리모트 접속은 인스턴스 생성 과정에서 다운로드한 SSH 키파일, 아이디 그리고 IP 를 이용하여 아래와 같이 접속할 수 있다. 개발 환경이 맥을 사용하고 있어 내장된 ssh  프로그램을 사용하였다.

ssh -i [키파일 경로] [아이디]@[IP]
 
ssh -i ssh-key-2020-10-03.key opc@xxx.xxx.xxx.xxx
The authenticity of host 'xxx.xxx.xxx.xxx (xxx.xxx.xxx.xxx)' can't be established.
ECDSA key fingerprint is SHA256:cb0AAC47vug6I8sNC7NPaIswm1+Xulwx8SAATP9D4+c. Are you sure you want to continue connecting (yes/no/[fingerprint])? yes Warning: Permanently added 'xxx.xxx.xxx.xxx' (ECDSA) to the list of known hosts.

MySql 설치

MySQL 을 yum 명령을 사용하여 설치하게되면 (실제) MariaDB 가 설치된다. 

sudo yum install mysql
 sudo yum install mysql
Loaded plugins: fastestmirror, langpacks
Loading mirror speeds from cached hostfile
 * base: mirror.kakao.com
 * epel: d2lzkl7pfhq30w.cloudfront.net
 * extras: mirror.kakao.com
 * updates: mirror.kakao.com
Resolving Dependencies
--> Running transaction check
---> Package mariadb.x86_64 1:5.5.65-1.el7 will be installed
--> Finished Dependency Resolution

Dependencies Resolved

========================================================================================================================================
 Package                        Arch                          Version                                 Repository                   Size
========================================================================================================================================
Installing:
 mariadb                        x86_64                        1:5.5.65-1.el7                          base                        8.7 M

Transaction Summary
========================================================================================================================================
Install  1 Package

Total download size: 8.7 M
Installed size: 49 M
Is this ok [y/d/N]:  y
Downloading packages:
mariadb-5.5.65-1.el7.x86_64.rpm                                                                                  | 8.7 MB  00:00:01     
Running transaction check
Running transaction test
Transaction test succeeded
Running transaction
  Installing : 1:mariadb-5.5.65-1.el7.x86_64                                                                                        1/1 
  Verifying  : 1:mariadb-5.5.65-1.el7.x86_64                                                                                        1/1 

Installed:
  mariadb.x86_64 1:5.5.65-1.el7                                                                                                         

Complete!

 
필요한것은 MySql Community Edition이기 때문에 설치된 Maria DB 를 삭제한다.
[opc@instance-20201003-1526 ~]$grep -i -e maria
mariadb.x86_64                         1:5.5.65-1.el7                 @base     
mariadb-libs.x86_64                    1:5.5.65-1.el7                 @anaconda 

[opc@instance-20201003-1526 ~]$yum remove mariadb-libs.x86_64 mariadb.x86_64
Loaded plugins: fastestmirror, langpackssudo 
Resolving Dependencies
--> Running transaction check
---> Package mariadb.x86_64 1:5.5.65-1.el7 will be erased
---> Package mariadb-libs.x86_64 1:5.5.65-1.el7 will be erased
--> Processing Dependency: libmysqlclient.so.18()(64bit) for package: 2:postfix-2.10.1-9.el7.x86_64
--> Processing Dependency: libmysqlclient.so.18(libmysqlclient_18)(64bit) for package: 2:postfix-2.10.1-9.el7.x86_64
--> Running transaction check
---> Package postfix.x86_64 2:2.10.1-9.el7 will be erased
--> Finished Dependency Resolution

Dependencies Resolved

===========================================================================================================================================================
 Package                               Arch                            Version                                    Repository                          Size
===========================================================================================================================================================
Removing:
 mariadb                               x86_64                          1:5.5.65-1.el7                             @base                               49 M
 mariadb-libs                          x86_64                          1:5.5.65-1.el7                             @anaconda                          4.4 M
Removing for dependencies:
 postfix                               x86_64                          2:2.10.1-9.el7                             @anaconda                           12 M

Transaction Summary
===========================================================================================================================================================
Remove  2 Packages (+1 Dependent package)

Installed size: 65 M
Is this ok [y/N]: y
Downloading packages:
Running transaction check
Running transaction test
Transaction test succeeded
Running transaction
  Erasing    : 1:mariadb-5.5.65-1.el7.x86_64                                                                                                           1/3 
  Erasing    : 2:postfix-2.10.1-9.el7.x86_64                                                                                                           2/3 
  Erasing    : 1:mariadb-libs-5.5.65-1.el7.x86_64                                                                                                      3/3 
  Verifying  : 1:mariadb-libs-5.5.65-1.el7.x86_64                                                                                                      1/3 
  Verifying  : 2:postfix-2.10.1-9.el7.x86_64                                                                                                           2/3 
  Verifying  : 1:mariadb-5.5.65-1.el7.x86_64                                                                                                           3/3 

Removed:
  mariadb.x86_64 1:5.5.65-1.el7                                             mariadb-libs.x86_64 1:5.5.65-1.el7                                            

Dependency Removed:
  postfix.x86_64 2:2.10.1-9.el7                                                                                                                            

Complete!


MySQL 8.0 Community Edition 설치는 설치 소스에 대한 YUM 레파지토리를 추가하고 진행하면 된다.

[opc@instance-20201003-1526 ~]$ wget http://repo.mysql.com/mysql80-community-release-el7-1.noarch.rpm
--2020-10-03 08:22:41--  http://repo.mysql.com/mysql80-community-release-el7-1.noarch.rpm
Resolving repo.mysql.com (repo.mysql.com)... 104.76.84.199
Connecting to repo.mysql.com (repo.mysql.com)|104.76.84.199|:80... connected.
HTTP request sent, awaiting response... 200 OK
Length: 25820 (25K) [application/x-redhat-package-manager]
Saving to: ‘mysql80-community-release-el7-1.noarch.rpm’

100%[=================================================================================================================>] 25,820      --.-K/s   in 0.003s  

2020-10-03 08:22:41 (8.12 MB/s) - ‘mysql80-community-release-el7-1.noarch.rpm’ saved [25820/25820]

[opc@instance-20201003-1526 ~]$ sudo rpm -ivh mysql80-community-release-el7-1.noarch.rpm
경고: mysql80-community-release-el7-1.noarch.rpm: Header V3 DSA/SHA1 Signature, key ID 5072e1f5: NOKEY
준비 중...                         ################################# [100%]
Updating / installing...
   1:mysql80-community-release-el7-1  ################################# [100%]
   
[opc@instance-20201003-1526 ~]$ sudo yum install mysql-server
Loaded plugins: fastestmirror, langpacks
Loading mirror speeds from cached hostfile
 * base: mirror.kakao.com
 * epel: d2lzkl7pfhq30w.cloudfront.net
 * extras: mirror.kakao.com
 * updates: mirror.kakao.com
mysql-connectors-community                                                                                                          | 2.5 kB  00:00:00     
mysql-tools-community                                                                                                               | 2.5 kB  00:00:00     
mysql80-community                                                                                                                   | 2.5 kB  00:00:00     
(1/3): mysql-tools-community/x86_64/primary_db                                                                                      |  76 kB  00:00:00     
(2/3): mysql-connectors-community/x86_64/primary_db                                                                                 |  62 kB  00:00:00     
(3/3): mysql80-community/x86_64/primary_db                                                                                          | 115 kB  00:00:00     
Resolving Dependencies
--> Running transaction check
---> Package mysql-community-server.x86_64 0:8.0.21-1.el7 will be installed
--> Processing Dependency: mysql-community-common(x86-64) = 8.0.21-1.el7 for package: mysql-community-server-8.0.21-1.el7.x86_64
--> Processing Dependency: mysql-community-client(x86-64) >= 8.0.11 for package: mysql-community-server-8.0.21-1.el7.x86_64
--> Running transaction check
---> Package mysql-community-client.x86_64 0:8.0.21-1.el7 will be installed
--> Processing Dependency: mysql-community-libs(x86-64) >= 8.0.11 for package: mysql-community-client-8.0.21-1.el7.x86_64
---> Package mysql-community-common.x86_64 0:8.0.21-1.el7 will be installed
--> Running transaction check
---> Package mysql-community-libs.x86_64 0:8.0.21-1.el7 will be installed
--> Finished Dependency Resolution

Dependencies Resolved

===========================================================================================================================================================
 Package                                     Arch                        Version                              Repository                              Size
===========================================================================================================================================================
Installing:
 mysql-community-server                      x86_64                      8.0.21-1.el7                         mysql80-community                      499 M
Installing for dependencies:
 mysql-community-client                      x86_64                      8.0.21-1.el7                         mysql80-community                       48 M
 mysql-community-common                      x86_64                      8.0.21-1.el7                         mysql80-community                      617 k
 mysql-community-libs                        x86_64                      8.0.21-1.el7                         mysql80-community                      4.5 M

Transaction Summary
===========================================================================================================================================================
Install  1 Package (+3 Dependent packages)

Total download size: 551 M
Installed size: 2.5 G
Is this ok [y/d/N]: y
Downloading packages:
경고: /var/cache/yum/x86_64/7/mysql80-community/packages/mysql-community-common-8.0.21-1.el7.x86_64.rpm: Header V3 DSA/SHA1 Signature, key ID 5072e1f5: NOKEY
Public key for mysql-community-common-8.0.21-1.el7.x86_64.rpm is not installed
(1/4): mysql-community-common-8.0.21-1.el7.x86_64.rpm                                                                               | 617 kB  00:00:00     
(2/4): mysql-community-libs-8.0.21-1.el7.x86_64.rpm                                                                                 | 4.5 MB  00:00:04     
(3/4): mysql-community-client-8.0.21-1.el7.x86_64.rpm                                                                               |  48 MB  00:00:15     
(4/4): mysql-community-server-8.0.21-1.el7.x86_64.rpm                                                                                                                                                                          | 499 MB  00:01:44     
------------------------------------------------------------------------------------------------------------------------------------------------------------------------------------------------------------------------------------------------------
Total                                                                                                                                                                                                                 5.0 MB/s | 551 MB  00:01:49     
Retrieving key from file:///etc/pki/rpm-gpg/RPM-GPG-KEY-mysql
Importing GPG key 0x5072E1F5:
 Userid     : "MySQL Release Engineering "
 Fingerprint: a4a9 4068 76fc bd3c 4567 70c8 8c71 8d3b 5072 e1f5
 Package    : mysql80-community-release-el7-1.noarch (installed)
 From       : /etc/pki/rpm-gpg/RPM-GPG-KEY-mysql
Is this ok [y/N]:  y
Running transaction check
Running transaction test
Transaction test succeeded
Running transaction
Warning: RPMDB altered outside of yum.
  Installing : mysql-community-common-8.0.21-1.el7.x86_64                                                                                                                                                                                               1/4 
  Installing : mysql-community-libs-8.0.21-1.el7.x86_64                                                                                                                                                                                                 2/4 
  Installing : mysql-community-client-8.0.21-1.el7.x86_64                                                                                                                                                                                               3/4 
  Installing : mysql-community-server-8.0.21-1.el7.x86_64                                                                                                                                                                                               4/4 
  Verifying  : mysql-community-server-8.0.21-1.el7.x86_64                                                                                                                                                                                               1/4 
  Verifying  : mysql-community-client-8.0.21-1.el7.x86_64                                                                                                                                                                                               2/4 
  Verifying  : mysql-community-common-8.0.21-1.el7.x86_64                                                                                                                                                                                               3/4 
  Verifying  : mysql-community-libs-8.0.21-1.el7.x86_64                                                                                                                                                                                                 4/4 

Installed:
  mysql-community-server.x86_64 0:8.0.21-1.el7                                                                                                                                                                                                              
Dependency Installed:
  mysql-community-client.x86_64 0:8.0.21-1.el7  mysql-community-common.x86_64 0:8.0.21-1.el7 mysql-community-libs.x86_64 0:8.0.21-1.el7                                       

Complete!

자세한 설치는 CentOS 7.x 에서 MySQL 8.x 설치하기 참조.
 
사용된 mysql 설정 : /etc/my.cnf
데이터베이스 및 계정 생성 스크립트 : database-mysql.sql 

VM 인스턴스  공인 IP 및 방화벽 설정

mysql 서버가 설치된 인스턴스를 외부에서 사용할 수 있도록 공인 IP 와 방화벽 설정을 추가했다.

❶ 인스턴스에 공인 IP 를 할당하기 위하여  네크워킹> IP 관리 메뉴에서 새로운 공인 IP 주소를 예약한다. (Reserve Public IP Address)


❷ 컴퓨트 > 인스턴스 > 인스턴스 세부정보 > 연결된 VNIC(Virtual Network Interface Cards) 메뉴에서 새로운 VNIC 추가하여 인스턴스에 공인 IP 를 할당한다.


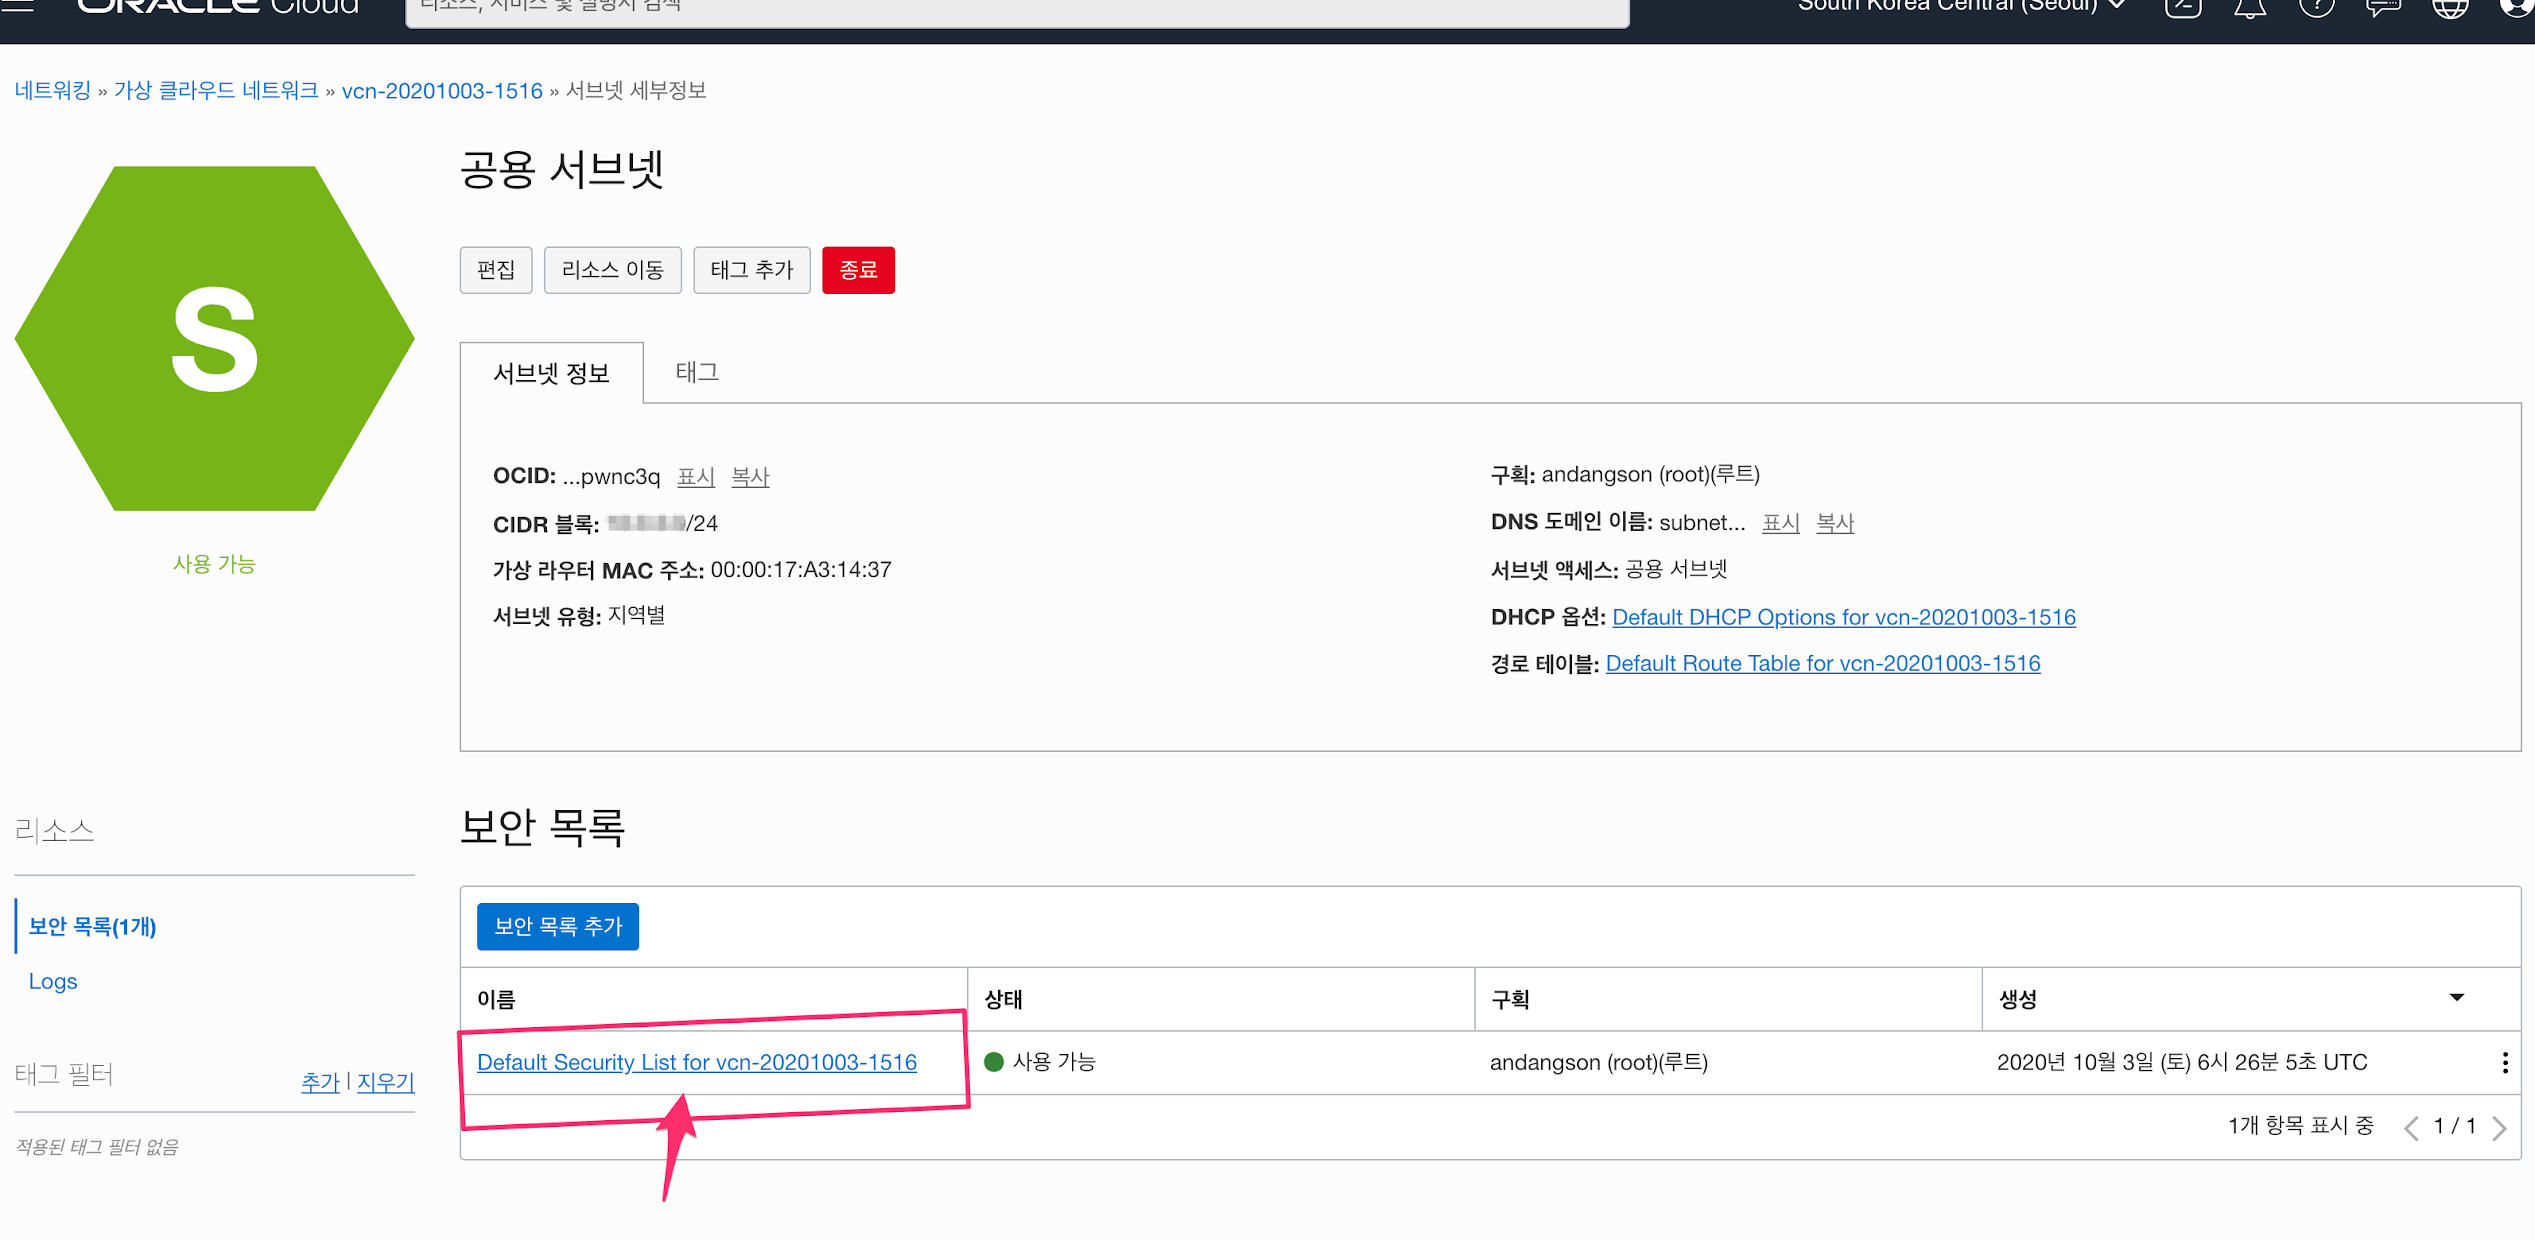
❸ 컴퓨트 > 인스턴스 > 인스턴스 세부정보 에서 공용 서브넷 을 클릭하여 공용 서브넷 관리 화면으로 이동한다.


디폴트로 생성되어 있는 보안 목록을 클릭하고 


MySql 서버에 대한 외부 접속 허용을 위하여 3306 포트에 대한 수신 규칙을 추가한다.


이로써 3306 포트로 외부에서 MySql 서버에 대한 통신이 허용된다. 

MySql Workbench 에서 접속한 화면 예시

MySql Workbench 에서 접속한 화면 예시


2020년 9월 16일

CentOS 7.x 에서 subversion 1.8 사용하기

Subversion 서버에서 소스를 가져와서 실행할 수 있도록 리눅스 기반 개발서버를 구성하여 사용하고 있다. 서버의 Subversion 버전이 업그레이드 되면서 클라이언트에 해당하는 개발 서버 역시 svn 도구의 업그레이드가 필요하게 되었다. 문제는 개발 서버에 설치된 리눅스 CentOS 7.x 버전에서는 subversion 1.7.x 버전이 Yum 설치를 통하여 지원되는 최신 버전이라는 점이다. (1.8 이상을 설치해야 한다.)

svn: E155021: This client is too old to work with the working copy at
'/app/webapps/xxx' (format 31).
You need to get a newer Subversion client. For more details, see
  http://subversion.apache.org/faq.html#working-copy-format-change


yum update subversion 명령을 사용하여 업데이트를 진행하였으나 1.7.14-14.el7 이 지원되는 최신 버전이다. 구글 검색을 해보니 Subversion 1.8.x 설치를 위하여 새로운 Yum repository 를 추가하고 설치하면 된는 것 같다. 

① 새로운 파일 /etc/yum.repos.d/wandisco-svn.repo 만들고 아래 내용을 추가한다.

#vi /etc/yum.repos.d/wandisco-svn.repo
[WandiscoSVN]
name=Wandisco SVN Repo
baseurl=http://opensource.wandisco.com/centos/$releasever/svn-1.8/RPMS/$basearch/
enabled=1
gpgcheck=0

② 설치된 subversion 를 제거하고 다시 설치한다.

yum remove subversion*
yum clean all
yum install subversion

마지막으로 설치가 끝나면  svn --version 명령을 사용하여 버전을 확인한다.

# svn --version

svn, version 1.8.19 (r1800620)
   compiled Aug 11 2017, 09:34:52 on x86_64-redhat-linux-gnu

Copyright (C) 2017 The Apache Software Foundation.
This software consists of contributions made by many people;
see the NOTICE file for more information.
Subversion is open source software, see http://subversion.apache.org/

The following repository access (RA) modules are available:

* ra_svn : Module for accessing a repository using the svn network protocol.
  - with Cyrus SASL authentication
  - handles 'svn' scheme
* ra_local : Module for accessing a repository on local disk.
  - handles 'file' scheme
* ra_serf : Module for accessing a repository via WebDAV protocol using serf.
  - using serf 1.3.8
  - handles 'http' scheme
  - handles 'https' scheme


참고자료 

2019년 5월 21일

MySQL 8.x 에서 루트 암호를 재설정하기 (CentOS 7.6)


https://support.rackspace.com/how-to/mysql-resetting-a-lost-mysql-root-password/

CentOS 에서는  mysqld_safe 명령이 존재하지 않아 실행할 수 없어 아래와 같은 방식으로 처리할 수 있었다.

⓵ SSH 를 이용하여 서버에 로그인한다. (root  계정)

⓶ mysqld 서버를 중지한다.

systemctl stop mysqld
⓷ --skip-grant-tables 옵션을 설정한다.

systemctl set-environment MYSQLD_OPTS="--skip-grant-tables"

⓸ mysqld 서버를 시작한다.

systemctl start mysqld

⓹ 다음 명령으로 비밀번호 입력없이 root 사용자로  mysql 에 로그인한다.

mysql -u root

⓺ 비밀번호를 변경한다.


UPDATE mysql.user SET Password=PASSWORD('NEW-PASSWORD') WHERE User='root';

-- 로걸호스트의 경우 비밀번호를 사용하지 않도록 하기 위해서는 아래와 같이 변경한다.

UPDATE mysql.user SET authentication_string='' WHERE user='root' and host='localhost';

flush privileges;

exit;


⓻  --skip-grant-tables 옵션을 제거 하고 mysqld 를 시작한다.

systemctl unset-environment MYSQLD_OPTS
systemctl start mysqld

2019년 3월 6일

SELinux 환경에서 아파치 - 톰켓 연결시 보안 오류

SELinux (Security Enhanced Linux) 는 리눅스 보안 커널의 일부로 RedHat 과 미국 NAS(National Security Agent) 간의 협업으로 배포되었다. SELinux 의 경쟁자로는 SUSE Linux Enterprise Server 의 AppArmor 이 있다.

리눅스 커널에서 SELinux 는 관리자가 설정한 규칙 및 정책에 따라 사용자의 접근을 제한하는 강제접근제어 (Mandatory Access Controls, 이하 MAC ) 을 사용한다.  MAC 방식은  임의접근제어 ( Discretionary Access Control, 이하 DAC ) 방식 보다 높은 수준의 접근 제어 방식으로 관리자가 사전에 승인한 파일들만 처리하는 방식으로 보안 침해를 방지한다.

이슈 

Apache HTTPD 와 새로운 Tomcat  연결시 8009 포트가 아닌 새로운 포트(여기에서는 8010을 사용) 를 사용하게 된다.

❶ 설정을 추가하고 서버를 다시 시작하면 Apache HTTPD 에서 Tomcat 과 연결할 수 없다는 오류가 발생하게 된다. (로그를 통하여 확인)

❷ 그러나 Tomcat 로그를 확인해보면 8010 포트로 정상 시작되었음을 로그를 통하여 확인할 수 있었다.

❸ Apache HTTPD 와  Apache Tomcat 이슈가 아닐 거라는 가정하에 리눅스 서버의 로그를 확인을 시도하였으며 /var/log/messages 로그에서 보안이슈를 확인할 수 있다.


Mar 3 10:56:21 localhost setroubleshoot: SELinux is preventing /usr/sbin/httpd from name_connect 
access on the tcp_socket port 8010. For complete SELinux messages. 
run sealert -l aa722160-f075-474c-bcd2-a2ce9535be26


문제해결

먼저 앞으로 문제해결을 위하여 사용할 기능들을 위하여 미리 (semanage , sepolicy) 다음 패키지를 설치한다.

#yum install policycoreutils-python
#yum install selinux-policy-devel

semanage 명령을 입력하여 httpd 서비스에 허용된 포트를 확인할 수 있다.

# semanage port -l | grep -w http_port_t
http_port_t                    tcp      80, 81, 443, 488, 8008, 8009, 8443, 9000


sepolicy 명령을 사용하는 방법도 있다.

# sepolicy network -t http_port_t
http_port_t: tcp: 80,81,443,488,8008,8009,8443,9000


이제 사용하려는 포트가 이미 등록되어 있는 포트는 아닌지 다음과 같이 확인한다. (이미 등록된 포트는 등록할 수 없다)

# sepolicy network -p 8010
8010: tcp unreserved_port_t 1024-32767
8010: udp unreserved_port_t 1024-32767
8010: sctp unreserved_port_t 1024-65535


이제 httpd 서비스에서 8010 포트를 사용할 수 있도록 아래과 같이 추가할 수 있다.

# semanage port -a -t http_port_t -p tcp 8010

  • 옵션 -d 를 사용하면 특정 서비스에 대하여 등록된 정책을 삭제 할 수 있다. 
  • 8010 포트가 이미 다른 서비스에 등록되어 있다면 -m 옵션을 사용한다. 


이제 아파치 서비스를 다시 시작하면 정상적으로 8010 포트를 통하여 톰켓과 접속함을 확인 할 수 있다.

결론 

SELinux 환경에서 Apache HTTPD 는 관리자에 의하여 미리 승인된 자원들에게만 접근이 가능하게 된다. 디폴트로 httpd 서비스의 경우 다음과 포트을 사용하는 것은 허용되어 있다. 그러나 이들 허용된 포트가 아닌 다른 포트를 사용하고자 하는 경우는 SELinux 정책을 수정해야 한다.

참고자료 

SELinux (Security-Enhanced Linux)
12 Critical Linux Log Files You Must be Monitoring
RHEL7: Use SELinux port labelling to allow services to use non-standard ports.

2018년 12월 1일

CentOS 에서 nmon 을 이용한 시스템 성능 분석

1. nmon 설치하기

Redhat 계열의 CentOS에서 nmon 설치는 다음과 같이 yum 을 사용하여 설치할 수 있다.
# yum install nmon
CentOS 7.x 환경에 nmon 패키지를 찾을 수 없는 경우 널리 사용되는 EPEL (Extra Packages for Enterprise Linux) 레파지토리를 아래와 같은 명령을 사용하여 추가하고 nmon 패키지를 설치하면 된다.
# yum install epel-release
nmon 은 커멘드 기반의 성능모니터링 툴로 설치 후  nmon 명령 입력하여 사용하여 실행할 수 있다.


아래의 키를 입력하면 해당하는 정보를 실시간으로 모니터링 할 수 있다. 프로그램 종료는 q 를 입력한다.

  1. m = Memory
  2. j = Filesystems
  3. d = Disks
  4. n = Network
  5. V = Virtual Memory
  6. r = Resource
  7. N = NFS
  8. k = kernel
  9. t = Top-processes
  10. . = only busy disks/procs


2. nmon 데이터 캡처 모드

nmon 을 이용한 실시간 모니터링도 가능하지만 아래와 같은 명령을 사용하여 성능데이터를 캡처하여 분석할 수도 있다.
# nmon -f -s13 -c 30

  1. -f : 출력하지 않고 로그로 남기겠다는 의미.
  2. -s13 : 13 초 단위로 데이터를 캡처하겠다는 의미.
  3. -c 30 : 데이터 캡처 횟수를 의미.
즉 13초 단위로 성능 데이터를 캡처하여 30회 로그로 남기겠다는 의미가 된다. 파라메터 값을 목적에 따라 수정하여 사용하면 된다.

다음은 3일동안 5분간격으로 데이터를 캡처하고자 한다면 아래와 같이 명령을 실행한다.

# nmon -f -s300 -c 30
위의 명령을 실행하면 db2_[yymmdd]_[hhmm].nmon 형식의 이름으로 파일이 생성되고 데이터가 저장되게 된다.


3. nmon analyzer

이렇게 생성된 로그는 엑셀로 구현된  "nmon analyzer" 를 사용하여 쉽게 성능 분석이 가능하다.

"nmon analyzer" 은 다음의 링크에서 무료 다운로드가 가능하며 excel 만 있다면 다른 도구 없이 바로 분석이 가능하다.


nmon_analyser : 사이트를 방문하여 다운로드 또는 아래 링크를 클릭하여 다운로드.

4. nmon analyzer  을 이용한 캡처된 데이터 분석하기 

① 다운로드한 nmon analyser v55.xlsm 파일을 클릭하여 프로그램을 실행하고


② "Analyze nmon data" 버튼을 클릭하여 nmon 에 의하여 캡처된 데이터 파일을 선택하면 분석이 진행된다.


③ 작업이 완료되면 분석 결과 엑셀을 저장하기 위하여 "다음이름으로 저장" 창이 보여지고 "저장"을 클릭하면 분석 결과 엑셀파일이 만들어 진다.


참고자료

nmon analyser -- A free tool to produce AIX performance reports
Nmon: Analyze and Monitor Linux System Performance